Hugs Card

Monday, May 30, 2011
If you are looking for this week's Fantabulous Cricut Challenge Me Monday post, please go HERE.

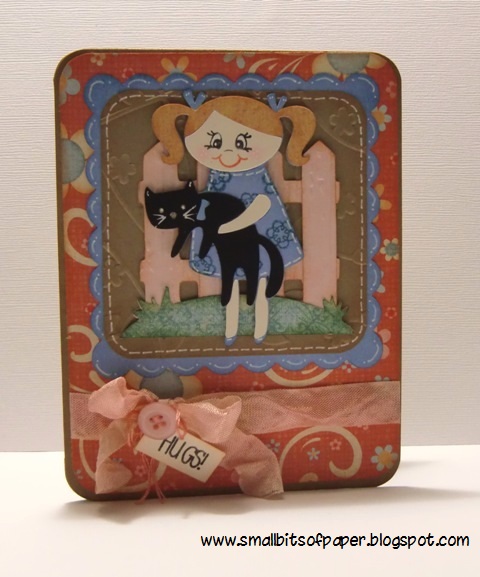
It's all about cute critters at My Craft Spot this week. As felines are my favourite critters, I decided to create a card with a cat.  Last week, I saw the Cricut Lite Meow cartridge on sale at our local Walmart and figured that this challenge was a great excuse to pick it up!  As I tend to purchase my cartridges online (they are SO much less expensive this way, often a quarter of the price), it was quite a treat to pick one up and come right home to use it after purchase!
The main image on this card is from the Cricut Lite Meow cartridge and the fence and hill are from Wrap It Up. The fence was embossed using the Cuttlebug Distressed Stripes folder.  I used a floral stamp (manufacturer unknown) to create a pattern on the little girl's dress and her face was stamped with a Peachy Keen stamp. The little girl and her cute critter were popped. The scalloped mat is from Kate's ABCs. I embossed the kraft mat with an Indentz folder and used a Creative Memories corner rounder punch on the mat and card base as well. I inked everything and did some doodling too. To create my sentiment, I used a stamp from My Craft Spot's Sweet Sentiments Set #1. I also used some fabulous Raspberry Truffle crinkle ribbon from My Craft Spot, some embroidery floss and a button to complete the look of the card.  When I showed the card to my youngest, he exclaimed, "That looks just like Electra!" (our cat) which made me smile.

There are some other wonderful projects on display at My Craft Spot to provide inspiration for this week's challenge.  Please go and check them out!  Then create your own cute critter project to link up in order to be eligible for this week's wonderful giveaway.  Also, Kimberly announced last week that My Craft Spot is now selling baker's twine from The Twinery too.  The colours are so bright and fun!
29

Discover Layout

This week, the challenge at Fantabulous Cricut is "Remember This".  We are challenging you to make something to remember a special person, time or anniversary.
I decided to make a layout to remember my youngest during a family holiday to England when he was two years old.   In the photo, he's on a play structure at a park, having climbed to the top to get a new perspective on things!  

Recipe:
My Mind's Eye - papers
New Arrival - giraffe
Hello Kitty Greetings and Love Language Tiny Hearts Cuttlebug folder - cloud (used as sand puddle)
Gypsy Wanderings - Discover
George and Basic Shapes - flag
My Craft Spot (Sweet Sentiments #2) - Treasure sentiment
EK Success, Stampin' Up, Martha Stewart, Michaels - various punches
Stampin' Up inks and white Gelly Roll pen
Please head over to Fantabulous Cricut to check out the great creations by the design team - and to enter this week's "Remember this" challenge!
18

Stampin' Up Card

Friday, May 27, 2011
I recently attended a Stampin' Up card class where I learned some new techniques and made a few cards!  This one is my favourite.  I can't really take credit as I had a sample and all the tools and supplies on the table.  I just had to ink, punch, and stick!  It was so much fun to get together with other crafters and create!
I am also delighted to be spotlighted today for the Fascinating Fridays feature on Paperie Designs' Studio.  Noor Nahdi is from Dubai and has such an incredible talent for paper crafting.  Please go and check out her amazing creations.  I'm sure you will be inspired!  (And a huge thank you to Tammy of Creating Somewhere Under the Sun for recommending me for this feature.)

Finally, my blogging friends Rhonda of Scrap Happens with Rhonda and Amy of Love to Scrap have teamed up to start a new challenge blog... Decorate to Celebrate.  The blog officially starts next week - but things are already underway with projects to share and a link-up party.  You can check it out HERE
17

You Make Life Sweet

Saturday, May 21, 2011
My FCCB design team sister, Sandee (from Inspired to Create), has recently introduced me to PageMaps. Sandee requested that the design team choose a sketch and create a project... so I did!
I pretty much followed the sketch as it is - including the apple! It's just that I saw the sketch and figured it would work wonderfully for a teacher appreciation card. 
Sandee has a post at FCCB today, showcasing a variety of projects created by some members of the FCCB design team using PageMaps sketches.  You can see the post HERE.

Recipe:
Holiday Cakes - top scalloped border
George and Basic Shapes - circle frame and shadow
Doodlecharms - apple
My Craft Spot - sentiment (Sweet Sentiments, Set #2)
Fiskars - bottom border
EK Success - corner punch
Michaels mini punch - little apples
Cuttlebug - Typeset embossing folder
Inks and white Gelly Roll pen
19

Doodlecharms Bus

Monday, May 16, 2011
I spent a long day reading yesterday.  I'm loving my course this semester (Social and Cultural Context of Education) and am fascinated by not only my required readings, but the blog responses written by my classmates which provide an amazing opportunity to expand my view of this world.  However, at the end of the day, my brain was drained so I managed to fit in a bit of crafting between homework with the children, supper, playtime and reading with my youngest.
I made this card for my middle guy's bus driver.  School isn't finished until the end of June so I'm happy to be ahead of the game!  Jenny, from Jenny's Scrapbooking Haven, let me know about the favourite cartridge challenge at Bug Juiced by Debbie.  As my favourite cartridge is Doodlecharms (I just LOVE the sweet little images for all seasons and occasions), I was pleased to discover that my card also meets the criteria for Emma's challenge at My Creative Time, where we are to use Doodlecharms and also something with the colour blue.  And it's "Transportation Week" at My Sheri Crafts, so I'll add my link there as well.  Riley and Company has a school theme - so I hope the school bus counts!

The card was fairly simple to put together.  As it is for a man, I didn't want to add too many embellishments.  The bus and little faces on my card are from Doodlecharms.  I manipulated the faces to make them a bit more round and then stamped them with Peachy Keen stamps.  The cap and hair were cut using Everyday Paper Dolls and I had to manipulate those a bit to fit the Doodlecharms faces.  I cut some extra tires in black and embossed them with my Cuttlebug and also added little brad hubcaps.  Last week, I saw a card created by Jamie from Cute Cards and Crafts by Jamie who stamped a sentiment across her Doodlecharms bus and I decided to do the same.  I used an EK Success punch for the corners and did a bit of faux stitching.  I also used my Stardust Gelly Roll pen over the sentiment, on the eyelashes and on the photo corners.  I finished things off with some baker's twine and a button. 
33

Fantabulous Cricut - Try This Angle

(If you are looking for this week's My Craft Spot Monday Challenge post, please click HERE.)

This week at Fantabulous Cricut, we are challenging you to "Try this angle"!  Use a rectangle and a triangle in your project - and be sure to have at least one Cricut cut as well.
I decided to make a thank you card.  The main image is from Car Decals and I used Design Studio to hide contours on various layers to create the dog in his house.  I used Distressed Stripes to the house as well.  The dog's face was stamped with a Peachy Keen stamp.  The sentiment was cut with the second layer of Cuttin' Up on real size.  I embossed the brown mat with Seeing Spots and also used a Recollections border punch on the bottom.  (I FINALLY went back to Michaels after having given it up for lent.  The punch was on clearance.  Woo hoo!)  I used a Fiskars corner punch to create all the triangles.  I did lots of inking and a bit of doodling, added some Glossy Accents to the nose, and finished things off with some twine and button from my stash.

Now it's your turn!  Head on over to Fantabulous Cricut to check out the projects created by the rest of the design team and then "try this angle" yourself!
24

Graduation Card - My Craft Spot

I'm so excited to show you my first project as a design team member for My Craft Spot! This week's Monday Challenge is Congratulations

At the end of June, my middle guy will be graduating from grade 8. In Canada, this is quite a big deal as it means he has finished elementary school and will move on to secondary (high) school next year. I made this card to give him so he knows how very proud we are of him. 
This card is 8.5 x 4. Here's a close up to see the embossing a bit better:
Recipe:
Cuttlebug "Congratulations" folder - large white mat
George and Basic Shapes - mini mats and shadows
Cuttlebug "Seeing Spots" folder - mini white mats
Mickey Font - "YOU DID IT!!"
Locker Talk - graduation cap
Hello Kitty Greetings - diploma
Fiskars - border punch
My Craft Spot - baker's twine for sale here
Button and PopDots (under each of the little mats)

Please head over to My Craft Spot to see the rest of the wonderful design team inspiration - and to link your own Congratulations project! 
19

Bee Happy - My Craft Spot Design Team!

Friday, May 6, 2011

I am delighted to announce that I am the newest member of the design team at My Craft Spot! My Craft Spot sells gorgeous crinkle ribbon, baker's twine and acrylic stamp sets - plus has a blog full of inspirational projects and weekly challenges. I'm thrilled and honoured that Kimberly has asked me to join her team and look forward to sharing My Craft Spot projects with you.

My Craft Spot

Card recipe (I made a set of six!):
Wrap It Up - card base
George and Basic Shapes - round mats (embossed with Cuttlebug), label
Create a Critter - bee and tre
Stampin' Up - sentiment
My Craft Spot - bakers' twine
Gelly Roll pens (white and Star Dust), chalk
31

Daffodil Card for Mother's Day

Monday, May 2, 2011
This week at Fantabulous Cricut, the challenge is "Flower Shower":  Create a project using at least three flowers.  I decided to create a Mother's Day card for my mum, which I will also link up at Cooking With Cricut (spring flowers), My Craft Spot (We love you Mum!), Whimsical Wednesday (spring has sprung) and My Sheri Crafts.   I played around with attaching a tag or sentiment to the front of the card but finally decided to stamp the inside with a simple "Happy Mother's Day". 
When I was first putting this card together, I didn't like the dark blue showing through each of the scalloped portions so I ended up punching circles using a Stampin' Up Itty Bitty punch using the scraps from the patterned paper.  I then attached each little circle behind the openings and am much happier now!

My favourite flower is the daffodil, and I know my mum loves them too.  The daffodils have finally bloomed in our gardens and it seems that spring is finally here!  On Sunday, I know I will be spoiled by my husband and children, beginning with the traditional breakfast in bed.  Later, we will celebrate Mother's Day at my mum's house with my mum, my oldest sister and her family and my oldest brother and his daughter, as well as my husband and children.   The men always order Swiss Chalet so the women get to rest and enjoy the day!  I'm looking forward to it!

Recipe:
George and Basic Shapes: card base, inner circles, yellow "tablecloth"
Easter 2010:  scalloped circle
Kate's ABCs: pitcher (embossed with Cuttlebug border folder from "With love" set)
Walk in my Garden: daffodils
Baker's twine, white Gelly Roll pen, PopDots, various inks from Stampin' Up
Sentiment (inside): Happy Mother's Day from My Creative Time's "Mom, You Rock"

Please head over to Fantabulous Cricut to check out the wonderful design team projects - and to link up your "Flower Shower" project!
36
Former Design Team Member at My Craft Spot (2011-2015)
My Craft Spot


Powered by Blogger.
Follow on Bloglovin

Followers

>